22 December 2012

Santa Nails

Equipment: - Base coat
           - Top coat
           - Nude nail polish
           - White nail polish
           - Red nail polish
           - Black nail polish
           - Pink nail polish
           - Dotting tool

Step 1: After preparing your nail with a base coat, proceed with
        two coats of your nude polish.

Nude nail polish christmas nail designs santa claus father christmas


Step 2: Take your red nail polish and paint a section near your
        cuticle, this section should cover roughly 1 third of
        your whole nail. This will be the Santa's hat.


Nude nail polish christmas nail designs santa claus father christmas red santa hat barry M

Step 3: Take your white nail polish and cover a third of your
        nail, this time at the tip. This will be his beard.

Nude nail polish christmas nail designs santa claus father christmas red santa hat barry M  beard Barry M white


Step 4: Still using your white nail polish, add a rim to Santa's
        hat by drawing a line of continuous circles. To do this
        you will need to use your dotting tool.
       
        Then use a nail art brush to connect the beard with the
        h
at at the sides of your nail.

Nude nail polish christmas nail designs santa claus father christmas red santa hat barry M  beard Barry M white


Step 5: Take your black nail polish and a small dotting tool and
        give your Santa two eyes. Clean the dotting tool and
        create a smaller pink circle just below the eyes to give
        him a nose.


Nude nail polish christmas nail designs santa claus father christmas red santa hat barry M  beard Barry M white pink nail polish No. 7 black nail polish rimmel london 60 seconds blackout 800


Step 6: For extra shine and wear add a coat of your favoured top
        coat and you are done! :D


This is a really simple nail design to keep you festive and make all your friends jealous! Maybe you could share it with your friends so they can do it too? Also if you have any requests, feel free to leave a comment :)

I hope you all have a wonderful Christmas!


10 December 2012

Reindeer Nails

There are only a few weeks left until Christmas! So I thought I should do some christmassy nails to get in the festive spirit, starting with reindeer :D

Equipment: - Basecoat
           - Topcoat
           - White nail polish
           - Brown nail polish
           - Black nail polish
           - Red nail polish
           - Nail art brush
           - Dotting tools (two sizes)

Step 1: Paint a coat of your favourite basecoat onto your nail
        
and let it dry. Then paint two coats of your white
        polish.

Christmas reindeer nails Barry M matt white 66


Step 2: Use your brown nail polish to paint a oval shape at the
        tip of your nail, this will form the reindeer's head.

Christmas reindeer nails Barry M matt white 66 Brown mushroom 310


Step 3: Take your nail art brush and brown polish and draw two
        antlers coming from the top of the reindeer's head.

Christmas reindeer nails Barry M matt white 66 Brown mushroom 310


Step 4: Make sure the reindeer's head is dry and then take your
        black nail polish to paint a smaller oval shape. This
        will be the nose. On one of my nails I tend to paint the
        nose red for Rudolph :)


Christmas reindeer nails Barry M matt white 66 Brown mushroom 310 black rimmel london 60 seconds 800


Step 5: Take your dotting tool and white nail polish and create
        two eyes for your reindeer.

Christmas reindeer nails Barry M matt white 66 Brown mushroom 310 black rimmel london 60 seconds 800


Step 6: Use a smaller dotting tool and with your black nail
        polish create the pupils of the eyes.

Christmas reindeer nails Barry M matt white 66 Brown mushroom 310 black rimmel london 60 seconds 800


Step 7: Add a coat of you favourite topcoat and you're done! :)


Please share this with your friends and leave any feedback you have - it all helps! I will be adding some other Christmas nail art ideas soon, so keep an eye out for them in the coming weeks! thank you :)

28 October 2012

Halloween Nails

Trick or Treat!

So it's almost Halloween - woop! And what better way is there to complete your fancy dress outfit than to have matching nails!? Below there are step-by-step instructions for 7 Halloween inspired nails, enjoy!  

Frankenstein

Equipment: - Green nail polish (Barry M 284)
           - White nail polish (Barry M 66)
           - Black nail polish (Rimmel london 60 seconds 800)
           - Black striper
           - Top coat
           - Base coat
           - Big dotting tool
           - Small dotting tool
            
Step 1: Prepare your nail using your favourite base coat and when
        that is dry, paint 2 coats using your green nail polish.


Frankenstein nails base coat barry m emerald green 284 for halloween


Step 2: Take your black striper pen and near your cuticle draw
        the outline of four triangles (the two edge ones should
        be longer than the middle ones). Fill them in to create
        Frankenstein's hair.


Frankenstein nails for Halloween Barry M emerald green nail polish 284 black striper pen nail art


Step 3: Put some white nail polish on a scrap piece of paper and
        using your big dotting tool, make two dots just under the
        hair.


Frankenstein nail art eyes using barry m emerald green 284 barry M matt white 66 and a striper pen for Halloween


Step 4: To complete the eyes, put some black nail polish on some
        scrap paper and put two small dots inside the white dots
        using your small dotting tool.


Frankenstein nail art eyes using barry m emerald green 284 barry M matt white 66 and rimmel london 60 seconds 800 with small dotting tool for Halloween


Step 5: Use your black striper pen and draw one diagonal line
        under the eyes. Then draw 3 smaller diagonal lines in the
        opposite direction over the longer line to create a scar.
       
        Complete your look with a Top coat and you're ready to
        Scare your friends!


The Eyeball

Equipment: - Basecoat
           - White nail varnish (Barry M 66)
           - Blue nail varnish (Barry M 317)
           - Black nail varnish (Rimmel London 60 seconds 800)
           - Red nail varnish
           - Top-coat
           - Thin nail art brush
           - Large dotting tool

Step 1: Coat your nails with your favourite basecoat and once dry
        go over with two coats of white nail polish.

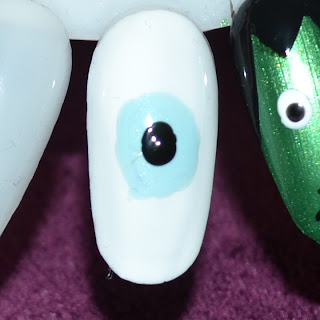
Step 2: Dab some blue nail varnish onto a piece of scrap paper
        and use your dotting tool to create a large circle in the
        center of your nail. You may need to make it bigger than
        the circle your dotting tool creates.


eye ball nail art Halloween blue nail polish barry m blue moon 317 dotting tool

Step 3: Once again use your dotting tool with black nail polish
        to create the pupil of the eye.

eye ball nail art Halloween blue nail polish barry m blue moon 317 and rimmel london 60 seconds 800 black out dotting tool


Step 4: Put some red nail varnish on a piece of scrap paper and
        use your thin nail art brush create veins around the
        outside of the eye. Complete the design with a layer of
        your favourite topcoat.

eye ball nail art Halloween blue nail polish barry m blue moon 317 rimmel london 60 seconds 800 black out using dotting tool and veins using red nail polish and nail art brush


Fangs

Equipment: - Basecoat (Barry M - 54)
           - Topcoat (Barry M - 54)
           - Black nail polish (Rimmel London 60 seconds - 800)

           - Red nail polish
           - White nail polish (Barry M - 66)
           - Thin nail art brush

           - Topshop black nail art pen (Nightrider)

Step 1: Use your favourite basecoat to prepare your nail and then
        when that's dry paint two coats of black nail polish.


Halloween nail art fangs vampire design black nail polish rimmel london 60 seconds 800 black out base coat


Step 2: Put some red nail polish on a piece of scrap paper and
        with your thin nail art brush draw a line at the cuticle
        and tip of the nail to represent the gums. 


Halloween nail art fangs vampire design black nail polish rimmel london 60 seconds 800 black out base coat red nail polish gums nail art brush

Step 3: Wash your nail art brush and then use it with some white
        nail polish to draw sharp triangle teeth coming out from
        both gums, pointing inwards towards the center of the

        nail.


Halloween nail art fangs vampire design black nail polish rimmel london 60 seconds 800 black out base coat red nail polish for gums white barry m 66 for teeth thin nail art brush barry m 54 topcoat topshop nail art pen

Step 4: To neaten up the teeth use Topshop's black nail art pen
        and draw a line around each tooth. Finish with your best
        topcoat to seal the design. 


Spider

Equipment: - Basecoat (Barry M - 54)
           - Topcoat (Barry M - 54)
           - Lilac nail polish (Barry M - 308)
           - Black nail polish (Rimmel London 60 seconds - 800)
           - Topshop black nail art pen (Nightrider)
           - Dotting tool

Step 1: Prepare your nail using your favourite basecoat and when 
        that's dry paint your nails with two coats of lilac nail
        polish or any other pale colour of your choice. 


Step 2: Put some black nail polish on a piece of paper and use
        your dotting tool to create one big circle and a small
        circle on top.


Halloween nail art spider witch themed nails lilac nail polish barry m 308 dotting tool

Step 3: Use your Topshop nail art pen in shade nightrider and
        draw 4 lines coming out of each side of the large circle

        to create the spiders legs. Finish with a layer of your 
        favourite topcoat.


Halloween nail art spider witch themed nails lilac nail polish barry m 308 dotting tool legs using topshop nail art pen nightrider

Dripping Blood

Equipment: - Basecoat (Barry M - 54)
           - Topcoat (Barry M - 54)
           - White nail polish (Barry M - 66)
           - Dark red nail polish (Barry M - 273)
           - Dotting tool

           - Nail art brush

Step 1: Prepare your nail with you favourite topcoat and then
        paint your nail with two coats of white nail polish.


Halloween nail art dripping blood for vampires barry m matt white 66

Step 2: Put some dark red nail polish on some scrap paper and use
        your dotting tool to create 3 dots about half way down
        the nail. Use a thin nail art brush to draw a rough line
        from the dot towards the cuticle.


Dripping blood nail art for halloween vampires dotting tool nail art brush barry m matt white 66 barry m raspberry 273


 Step 3: Use the same red nail polish and connect all three drips
        
together. Fill in with nail polish. Seal the design with        your favourite topcoat. 


Dripping blood nail art for halloween vampires dotting tool nail art brush barry m matt white 66 barry m raspberry 273


Ghost

Equipment: - Basecoat (Barry M - 54)
           - Topcoat (Barry M - 54) 
           - Dark blue nail polish (Barry M 312)
           - White nail polish (Barry M - 66)
           - Nail art brush 
           - Dotting tool

Step 1: Prepare your nail with one coat of your favourite topcoat
        and when that is dry go over it with two coats of a dark 

        blue nail polish.


Ghost nails for halloween barry m indigo 312 base colour

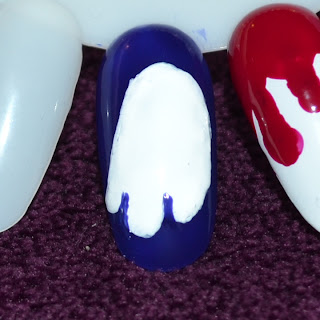
Step 2: Use your dotting tool to create three small dots near the
        tip of the nail and then using your small nail art brush
        and white nail polish, join them together and make the
        outline of a ghost. Fill the shape in using your white 
        polish.


Ghost nails for halloween barry m indigo 312 base colour matt white 66 barry m nail art brush dotting tool

Step 3: Use your dotting tool and dark blue nail polish to create
        two circles for the ghost's eyes.


Ghost nails for halloween barry m indigo 312 base colour matt white 66 barry m nail art brush dotting tool

Step 4: Use your nail art brush and blue nail polish to create a
        mouth for your ghost. I chose a smiley mouth but you
        could also use your dotting tool to make an 'O' shaped 
        mouth. Complete the design with a coat of your favourite 
        topcoat.


Ghost nails for halloween barry m indigo 312 base colour matt white 66 barry m nail art brush dotting tool


Pumpkin

Equipment: - Basecoat (Barry M - 54)
           - Topcoat (Barry M - 54)
           - Black nail polish (Rimmel London 60 seconds - 800)
           - Orange nail polish (Barry M - 318)
           - Green nail polish (p2 colour victim - 620)
           - Topshop nail art pen (nightrider)
           - Nail art brush

Step 1: Prepare your nail with a coat of you favourite base coat 
        and then on top paint two coats of black nail polish.

Rimmel London black out 800 pumpkin halloween nail art

Step 2: With your orange nail polish paint a pumpkin shape in the
        middle of the nail.

pumpkin halloween nail art Rimmel London black out 800 barry m peach melba 318

Step 3: Put some green nail polish on a piece of scrap paper and 
        with your nail art brush draw the stalk of a pumpkin.

pumpkin halloween nail art Rimmel London black out 800 barry m peach melba 318 stalk p2 colour victim 620 artful

Step 4: Take your Topshop nail art pen in the shade nightrider
        and draw two triangles at the top of the pumpkin. If you 
        don't have Topshop's nail art pen you can use a nail art 
        brush and normal black nail polish.

pumpkin halloween nail art Rimmel London black out 800 barry m peach melba 318 stalk p2 colour victim 620 artful eyes Topshop nail art pen nightrider

Step 5: Take your Topshop nail art pen again and draw a mouth in
        whatever shape you want your pumpkin to have.

pumpkin halloween nail art Rimmel London black out 800 barry m peach melba 318 stalk p2 colour victim 620 artful eyes and mouth Topshop nail art pen nightrider

Step 6: Once again using the Topshop nail art pen add a dot to
        create a nose for your pumpkin. When dry add a coat of
        your favourite topcoat to seal your design.

pumpkin halloween nail art Rimmel London black out 800 barry m peach melba 318 stalk p2 colour victim 620 artful eyes and mouth and nose Topshop nail art pen nightrider


Thank you so much for reading this, I hope you give one design a go! If you liked this blog post please share it with your friends and  HAPPY HALLOWEEN! :D

28 September 2012

Duo - Colour Nails

My cousin came over and asked if I could do her nails, she wanted them to be two colours and bold. So that's what I did! 

Equipment:
- Base coat
- 3 different coloured nail polishes (I used green, yellow and
  burgundy).
- Black striper pen (optional)
- Topcoat


Step 1:

Prep your nails using your favourite base coat and then using your first nail polish (in my case I used green) paint two coats.


base coat green nail art duo-colour nail art two colour nail art using black striper pen


Step 2:

Take your second colour and paint half of the nail with a curve shape. I used this same colour on every other nail and chose a different colour for the rest of them. You could have the same colour on each nail or different colours on every nail - it's up to you! If you have longer nails you may want to use 3 different colours on each one, just make each section slightly smaller.


two colour nail art design green yellow red curved

Step 3:

This step is optional, my cousin chose not to have it, however to add a little bit more detail you can use your black striper and follow the curve to separate out the two colours.

Step 4:

To complete your design add a coat of your favourite topcoat to help set the nail polish.


duo-colour nail art green yellow red curved simple nail art for beginners and short nails


Thank you for taking the time to read this, I hope you give it a go! Any questions you have I will be happy to answer :) 


11 September 2012

Sausage Dog Nail Art

I found a picture the other day and someone had painted their nails as a sausage dog! I loved the idea so I had to have a go myself :) Here's how I did it:

Equipment:
- Green nail polish (or any other colour to use as a base colour)
- Brown nail polish
- White nail polish
- Black nail polish
- Nail art brush
- Dotting tool
- Topcoat
- Basecoat

Step 1 - The Base Colour:

Using your basecoat, prepare the nail. When that is dry paint 2 coats of a base colour of your choice. I used Barry M - mint green.

Mint green barry M nail polish cute sausage dog nail art


Step 2 - The Body:

Take your brown nail polish and on your middle and ring finger paint a rectangle across your nail (you want to try and get them the same size if you can).

Then on your index finger paint another rectangle the same size as before and add a small, curved line near the tip of your nail to make the front legs of the sausage dog.

On your thumb you are going to paint the head. At the tip of your nail paint an oval shape that extends out on one side (the picture below should make this clearer for you).

Finally on you little finger use your dotting tool to create a small circle. Then use your nail art brush to draw one curved line going towards the cuticle (this is going to be the tail) and one curved line going towards the tip of the nail (this will be the back legs of the dog).

sausage dog body nail art cute bones using barry m mushroom a dotting tool and nail art brush

Step 3 - Finishing Touches:

Using you black nail polish and a small dotting tool, add an eye to the dog. 

Then take your white nail polish and nail art brush and create small bones around the body of the sausage dog. 

Finally finish your design with a topcoat of your choice.

sausage dog body nail art cute bones using barry m mushroom a dotting tool and nail art brush


Thank you for reading this, I hope it was clear to you and you are able to give this really cute sausage dog a go. If you have any questions, feel free to ask :) 


23 August 2012

Pineapple Nails

Pineapple Nails

We've been having some nice weather recently and for some reason it made me think of pineapples! So i decided to do some pineapple nail art :) Here's how i did it:

Equipment I used:

- Barry M basecoat/topcoat/nail hardener (no. 54)
- Barry M Pink Flamingo (no. 305)
- Barry M Lemon Ice Cream (no. 307)
- Barry M Emerald Green (no. 284)
- Barry M Mushroom (no. 310)
- Thin nail art brushes


Step 1:

Apply a basecoat and when dry use two coats of your Barry M Pink Flamingo for the base colour.


Barry M Pink Flamingo base coat


Step 2:

Using the normal brush in the polish, create an oval shape near the tip of your nail using Barry M Lemon Ice Cream. This will form the body of the pineapple. I just did this on my thumbs and ring fingers, however you can do it on as many nails as you like! 


Barry M Lemon Ice Cream Nail Varnish Pineapple Body Summer


Step 3:

Take your thin nail art brush or a cocktail stick and your Barry M Emerald Green polish and draw a straight line from the top of the pineapple to form the middle leaf. Then draw curved lines around the top of the pineapple for the rest of the leaves.

Barry M Emerald Green nail polish, Pineapple, Leaves, Nail art, Brush, Pink nails


Step 4:

Using a different nail art brush and your Barry M Mushroom polish create a criss-cross pattern on the body of the pineapple.


Pineapple, Barry M, Mushroom polish, Criss-cross nail art, Leaves, Pink nail art, Summer nail art, nail art


Step 5:

To finish this summery look add a topcoat, this will help your design last for longer as well as adding a bit of a shine to your nails! :D


Thank you for reading my blog, I hope you give this look a go! If you have any questions just ask below! 


7 August 2012

Olympic Nail Art

Olympic Inspired Nails

As you all know, the Olympics have finally come to London! I managed to get tickets to see the volleyball at Earls Court so I decided I would paint my nails with an Olympic theme to match the occasion. I saw a picture on Google and decided to try it out. Here's how I did it:

Equipment:
- Navy blue nail polish
- White nail polish
- Red nail polish
- Black nail polish
- Green nail polish
- Yellow nail polish
- Thin nail art brush

Step 1:

Using you favourite base coat paint on one or two coats. When that is dry paint both you thumb and ring finger with two coats of white nail polish (I used Barry M) and paint the other three fingers with a dark/navy blue polish:

Olympic nails, nail art, union jack nail art, Olympic ring nail art, Jemma sherman nail art

Step 2

On your thumb use your nail art brush to draw the Olympic rings (the order is blue then black then red on the top and then yellow then green underneath). To get the paint on your brush you can either dip the brush into the pot or you can put a blob of nail varnish on a piece of scrap paper and then dip the brush in the blobs. Underneath the rings, use your nail art brush and black nail polish to write 2012.

Olympic nails, nail art, union jack nail art, Olympic ring nail art, Jemma sherman nail art

Step 3:

For the union jacks use either a white striper or your nail art brush to draw a cross in the middle of your nail with an X on top. You will need to make these lines quite thick in order to be able go over the top of with a thin line of red polish to finish off the union jacks.

Step 4:

Lastly for the ring finger simply take you nail art brush and draw 5 lines in the order blue, black, red, yellow and green (this represents the colours of the Olympic rings). To finish go over every nail with your favourite topcoat which will help to make your design last for longer :)

Olympic nails, nail art, union jack nail art, Olympic ring nail art, Jemma sherman nail art

NOTE:

If you are from a different country, you could try and replace the union jacks with your own flag or you could replace them with something else for example a medal. To do this you would need to paint your nail with a pale colour (I would use white) and then using a dotting tool make a dot of bronze, silver or gold nail varnish at the tip of you nail. Then use a striper or nail art brush and red nail varnish to make the straps of the medal.


I hope you give this Olympic design a go and have fun experimenting with the designs that you use e.g. you could have all union jacks or all Olympic rings. Thank you for taking the time to read this, please share it with your friends so they too can give this design a go!