Halloween Nails
Trick or Treat!
So it's almost Halloween - woop! And what better way is there to complete your fancy dress outfit than to have matching nails!? Below there are step-by-step instructions for 7 Halloween inspired nails, enjoy!
So it's almost Halloween - woop! And what better way is there to complete your fancy dress outfit than to have matching nails!? Below there are step-by-step instructions for 7 Halloween inspired nails, enjoy!
Frankenstein
Equipment: - Green nail polish (Barry M 284)
- White nail polish (Barry M 66)
- Black nail polish (Rimmel london 60 seconds 800)
- Black striper
- Top coat
- Base coat
- Big dotting tool
- Small dotting tool
- White nail polish (Barry M 66)
- Black nail polish (Rimmel london 60 seconds 800)
- Black striper
- Top coat
- Base coat
- Big dotting tool
- Small dotting tool
Step 1: Prepare your nail using your favourite base coat and when
that is dry, paint 2 coats using your green nail polish.
that is dry, paint 2 coats using your green nail polish.
Step 2: Take your black striper pen and near your cuticle draw
the outline of four triangles (the two edge ones should
be longer than the middle ones). Fill them in to create
Frankenstein's hair.
Step 3: Put some white nail polish on a scrap piece of paper and
using your big dotting tool, make two dots just under the
hair.
Step 4: To complete the eyes, put some black nail polish on some
scrap paper and put two small dots inside the white dots
using your small dotting tool.
Step 5: Use your black striper pen and draw one diagonal line
under the eyes. Then draw 3 smaller diagonal lines in the
opposite direction over the longer line to create a scar.
Complete your look with a Top coat and you're ready to
Scare your friends!
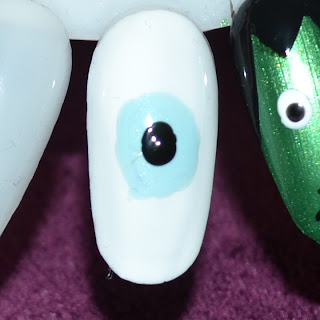
The Eyeball
Equipment: - Basecoat
- White nail varnish (Barry M 66)
- Blue nail varnish (Barry M 317)
- Black nail varnish (Rimmel London 60 seconds 800)
- Red nail varnish
- Top-coat
- Thin nail art brush
- Large dotting tool
- White nail varnish (Barry M 66)
- Blue nail varnish (Barry M 317)
- Black nail varnish (Rimmel London 60 seconds 800)
- Red nail varnish
- Top-coat
- Thin nail art brush
- Large dotting tool
Step 1: Coat your nails with your favourite basecoat and once dry
go over with two coats of white nail polish.
Step 2: Dab some blue nail varnish onto a piece of scrap paper
and use your dotting tool to create a large circle in the
center of your nail. You may need to make it bigger than
the circle your dotting tool creates.
go over with two coats of white nail polish.
Step 2: Dab some blue nail varnish onto a piece of scrap paper
and use your dotting tool to create a large circle in the
center of your nail. You may need to make it bigger than
the circle your dotting tool creates.
Step 3: Once again use your dotting tool with black nail polish
to create the pupil of the eye.
to create the pupil of the eye.
Step 4: Put some red nail varnish on a piece of scrap paper and
use your thin nail art brush create veins around the
outside of the eye. Complete the design with a layer of
your favourite topcoat.
Fangs
Equipment: - Basecoat (Barry M - 54)
- Topcoat (Barry M - 54)
- Black nail polish (Rimmel London 60 seconds - 800)
- Red nail polish
- White nail polish (Barry M - 66)
- Thin nail art brush
- Topshop black nail art pen (Nightrider)
Step 1: Use your favourite basecoat to prepare your nail and then
when that's dry paint two coats of black nail polish.
Step 2: Put some red nail polish on a piece of scrap paper and
with your thin nail art brush draw a line at the cuticle
and tip of the nail to represent the gums.
Step 3: Wash your nail art brush and then use it with some white
nail polish to draw sharp triangle teeth coming out from
both gums, pointing inwards towards the center of the
nail.
Step 4: To neaten up the teeth use Topshop's black nail art pen
and draw a line around each tooth. Finish with your best
topcoat to seal the design.
Spider
Equipment: - Basecoat (Barry M - 54)
- Topcoat (Barry M - 54)
- Lilac nail polish (Barry M - 308)
- Black nail polish (Rimmel London 60 seconds - 800)
- Topshop black nail art pen (Nightrider)
- Dotting tool
Step 1: Prepare your nail using your favourite basecoat and when
that's dry paint your nails with two coats of lilac nail
polish or any other pale colour of your choice.
Step 2: Put some black nail polish on a piece of paper and use
your dotting tool to create one big circle and a small
circle on top.
Step 3: Use your Topshop nail art pen in shade nightrider and
draw 4 lines coming out of each side of the large circle
to create the spiders legs. Finish with a layer of your
favourite topcoat.
Dripping Blood
Equipment: - Basecoat (Barry M - 54)
- Topcoat (Barry M - 54)
- White nail polish (Barry M - 66)
- Dark red nail polish (Barry M - 273)
- Dotting tool
- Nail art brush
Step 1: Prepare your nail with you favourite topcoat and then
paint your nail with two coats of white nail polish.
Step 2: Put some dark red nail polish on some scrap paper and use
your dotting tool to create 3 dots about half way down
the nail. Use a thin nail art brush to draw a rough line
from the dot towards the cuticle.
together. Fill in with nail polish. Seal the design with your favourite topcoat.
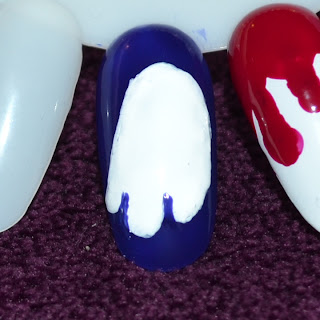
Ghost
Equipment: - Basecoat (Barry M - 54)
- Topcoat (Barry M - 54)
- Dark blue nail polish (Barry M 312)
- White nail polish (Barry M - 66)
- Nail art brush
- Dotting tool
Step 1: Prepare your nail with one coat of your favourite topcoat
and when that is dry go over it with two coats of a dark
blue nail polish.
Step 2: Use your dotting tool to create three small dots near the
tip of the nail and then using your small nail art brush
and white nail polish, join them together and make the
outline of a ghost. Fill the shape in using your white
polish.
Step 3: Use your dotting tool and dark blue nail polish to create
two circles for the ghost's eyes.
Step 4: Use your nail art brush and blue nail polish to create a
mouth for your ghost. I chose a smiley mouth but you
could also use your dotting tool to make an 'O' shaped
mouth. Complete the design with a coat of your favourite
topcoat.
Pumpkin
Equipment: - Basecoat (Barry M - 54)
- Topcoat (Barry M - 54)
- Black nail polish (Rimmel London 60 seconds - 800)
- Orange nail polish (Barry M - 318)
- Green nail polish (p2 colour victim - 620)
- Topshop nail art pen (nightrider)
- Nail art brush
Step 1: Prepare your nail with a coat of you favourite base coat
and then on top paint two coats of black nail polish.
Step 2: With your orange nail polish paint a pumpkin shape in the
middle of the nail.
Step 3: Put some green nail polish on a piece of scrap paper and
with your nail art brush draw the stalk of a pumpkin.
Step 4: Take your Topshop nail art pen in the shade nightrider
and draw two triangles at the top of the pumpkin. If you
don't have Topshop's nail art pen you can use a nail art
brush and normal black nail polish.
Step 5: Take your Topshop nail art pen again and draw a mouth in
whatever shape you want your pumpkin to have.
Step 6: Once again using the Topshop nail art pen add a dot to
create a nose for your pumpkin. When dry add a coat of
your favourite topcoat to seal your design.
Thank you so much for reading this, I hope you give one design a go! If you liked this blog post please share it with your friends and HAPPY HALLOWEEN! :D


